Solar Power Tutorial

By reading this, you will learn  how to setup a tower in an area that does not have a grid power supply readily accessible using solar as a good alternative.

The base of working out your requirement is:

Solar Power In must be higher than Power Out.

You must capture more energy from the sun than you use.

Step 1 – How much power do you use?


To work out your power requirements, you need to look at all the radios or devices you will have on your tower. Each device will have a wattage rating which can be obtained usually by googling the model and the words watt power.

If you cannot find the watt rating of the device using Google, you can use a multimeter, or a very good device to have on hand is a product called a Kill-a-watt. A Kill-a-watt is a device with a similar shape to a surge protector with a small screen. It tells you how many watts per hour the device that you plug into it will be using.

For reference:

  • Powerstation 2 6.5w
  • Nanostation2 4w
  • Nanostation2 Loco 4w
  • Bullet2 4w – Picostation2 4w
  • Bullet2HP / Pico HP 8w

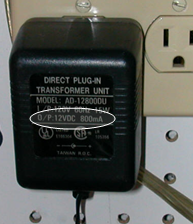
Another way to work out how much power a device uses, is to look at the wall wart or transformer.

original

The above transformer states that it has an output of 12 volts at 800 milliamps. To convert a voltage and amp rating to watts, we multiply one by the other.

12v x 0.8a = 9.6 watts. – This transformer is capable of powering a device that uses up to 9.6 watts. The device may not use 9.6 watts and so you would need to use a multimeter or kill-a-watt to get a more accurate prediction.

Important Note:

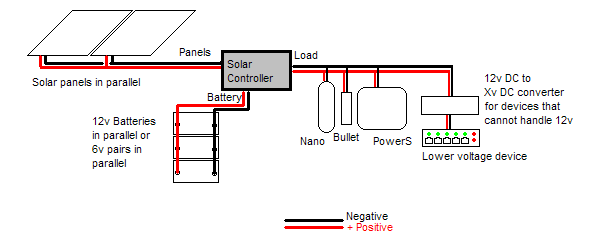
You should always look for 12 volt equipment. If your device can not handle a 12 volt supply you will need to get a 12volt DC to X volt DC Converter which means losing some power during the conversion. The abovementioned reference devices can handle a direct connection to a 12 volt battery which makes them suitable for solar use.

Another important note is that you should only use DC devices. If the device’s transformer says it has an AC output, then it will have extra supply requirements that cost more and has a power loss through the DC to AC conversion.

Once you have worked out the watt ratings of all your devices, add them together.

If we had a PowerStation2 and a Bullet2HP, we would be using a total of 14.5 watts per hour.

To work out how many watts per day, multiply the hourly usage by 24. For our example PS2 and B2HP, we are using 348 watts per day.

Step 2 – The Battery Bank


A battery bank is used to store captured solar power for using at night or on rainy / overcast days. Your battery bank needs to be made of one or more deep cycle batterys that will run your equipment for a number of days without sunlight.

A good goal in most areas would be to run for 4 or 5 days without sunlight.

What is a deep cycle battery?

A deep cycle battery is a special type of large capacity battery which can be discharged regularly to about 50% of its capacity. They are a similar size to a car battery but the difference is the chemicals inside.

A car battery is designed to be discharged only a small amount, then recharged instantly. Discharging a car battery will leave it with a very bad memory effect and this effect worsens as it goes without being recharged. 20 large discharges may damage a car battery and stop it from ever being fully charged again, where as a deep cycle battery can handle several hundered deep discharges, and go longer without being recharged.

Even with the discharge capability of a deep cycle battery, it should never drop below 50% of its capacity, but can go several days or sometimes weeks without being recharged and still be as good as new.

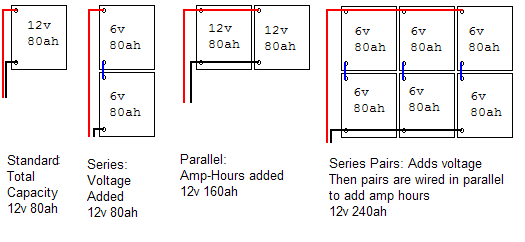
A deep cycle battery will have a rating on the side. It will specify a voltage – usually 6 or 12, and an amp-hour / Ah rating. More expensive batteries will have a higher amp-hour rating and therefore have a larger capacity. It is recomended that you purchase 12 volt batteries because your solar panels will most likley be 12 volt. If you need to purchase 6 volt batteries, they can be wired in a special way to increase the voltage to 12. You can purchase more batteries to add capacity as we will see below.

Wiring Methods

There are 2 ways to wire batteries together. You can use both at the same time if you like.

  • Parallel: This means that the amp-hour capacity of the batteries will be added together
  • Series: This means that the voltage of the batteries will be added together

Wiring Methods

So what size battery bank do you need?

You will need a battery bank that will run your tower for a set amount of days without sunlight, and still not be discharged more than 50%. To work this out, we take the daily power usage, multiply it by the number of days , and then multiply again by 2 so we factor in the 50% discharge limit.

In the example above of a PS2 and a B2HP, we need 4 days of 348 watts, multiplied by 2. This means our battery bank capacity needs to be 2,784 watts.

To convert the watts back to amp-hours, we would divide by the battery voltage rating (12) so 2784 / 12 = 232 Ah total. Lets just round this to 240 Ah.

To achieve this, we could have:

  • 2x 6 volt 240Ah wired in series
  • 2x 6 volt 120Ah batteries wired in series -parallel- to another pair of 2x 6 volt 120Ah wired in series
  • 2x 12 volt 120Ah batteries wired in parallel.

Types of Batteries

  • Flooded / Wet Cells: The older and more common type of deep cycle battery. Needs maintanence such as water topups. Water is lost in gases when charging.
  • Gel or AGM: Are sealed and maintanence free. There is no gas lost becuase the battery case is sealed and a special solar controller needs to be used so that the built up pressure from the gasses does not damage the battery. Gel or AGM are able to deliver more power, faster and so are ideal for starting engines or using on boats. They work well for our WISP radio towers too.

Step 3 – What size panel do you need?


This depends upon the average daily sunlight hours in your area during winter time.

  • Insolaton is the correct measurement to use. Insolation is a measurement of the sun’s energy that reaches a specific area of the earth’s surface. It is more accurate than sunlight hours as it takes into account the angle of the sun, and various other environmental factors. Sunlight hours can easily be used where you are using less than 20 watts of load

In the example scenario, we have 4 hours each day on average during the winter months. You can find out your area’s sunlight hours from your local weather agency.

The solar panel will need to be able to capture enough solar power to run your equipment for the day, as well as recharge your battery bank following a rainy or overcast period. It also needs to be able to do this during winter.

So if the example has 4 hours of sunlight to capture 24 hours worth of power (348 watts), that’s a basic requirement of an 87 watt solar panel. (348 / 4 = 87 watts per hour.

Now we need to factor in the recharging after a rainy or overcast period. If it rained for 4 days, and on the 5th day it was sunny, thats 5 days worth of power that needs to be captured. In the example thats 1,740 watts worth of power. We also need to capture this power as fast as possible before it rains again. So to capture 1,740 watts of power during 4 hours of sunlight, that means we need a 435 watt panel. If we wanted to, we could set a goal of recharging the batteries over 2 days. That means we have 8 hours to capture 6 days worth of power – which a 260 watt panel would be able to do. If you decide to set a longer recharge period, you can save some money on solar panels, but will need to spend more on adding more capacity to your battery bank incase you only get one sunny day and it returns to rain.

It is also probable that if you have an average of 4 hours of sunlight per day in winter, that also means half the days will be rainy or overcast, and the other half would be sunny. This means that on the sunny day, there could be up to 8 hours to capture the required power instead of the 4 assumed above. It is best to oversize your panels just in case, so you should not rely too much on extra average sunlight hours from rainy days.

Types of Solar Panels

  • Polycrystalline: Are cheaper to produce, but are not as efficient as mono. Panels are usually larger for the same watt rating.
  • Monocrystalline: Are more expensive to produce but are more efficient than poly and can capture the more watts per square foot of solar cells.

Overcast Days: Some panels will still capture solar energy when there is a light overcast of cloud (bright white clouds) and they can sometimes work at up to 40% of the panel’s rating. You may be interested in checking how your panel performs by using a multimeter and testing the panel’s output on an overcast day.

Next we will look at the bit that joins everything together.

Step 4 – The Solar Controller


A solar controller can perform 6 main tasks:

  • Prevents power from the battery traveling back up and getting lost through the solar panel at night
  • Prevents the panels from overcharging the battery by disconnecting them when the battery is full
  • Gives an indication on the battery bank’s State Of Charge
  • Stops the batteries from being discharged too much by disconnecting your devices when the battery SOC gets too low.
  • Counts how much power you have generated and how much power your devices have used
  • Helps lower the amount of maintanence work required on your batteries by charging in certain ways

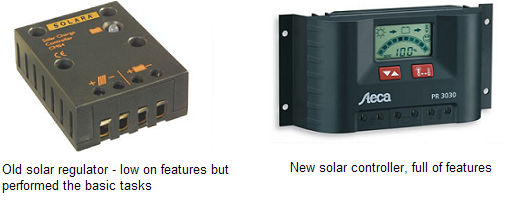
Old solar controllers used to be called solar regulators. This is simply because they stopped the battery getting overcharged and would simply use a relay and volt metre to check when to disconnect or reconnect the panel.

Controller

You will want to make sure you get a solar controller that will display the state of charge for your battery bank. This helps diagnose problems if your tower stops working and your customers need it fixed urgently.

Sizing solar controllers

Your panels will have a maximum amp output current. If you have wired your panels in parallel, you will need to add together the maximum amp output current of each of them – you will want a controller that can handle at least this amount with pleanty of capacity to spare. It may be wise to purchase a controller that handles double the current than what you need in case you wish to add more radios or panels in the future.

Also check if you have used gel or liquid flooded batteries and that the controller or regulator will work with your batteries. This is especially true if you use AGM or gel batteries. The controller needs to be set to charge in a specific way so that it doesnt cause high gas pressure inside the sealed battery. Flooded batteries need ventilation becuase they are not completely sealed and gasses escape when charging.

The Load Output

One important feature of a solar controller is the load output. This is where you connect your devices. You must be careful with this feature though. Some controllers assume it will be to automatically control lighting and so switches the load output on in the evening and off during the day. For our 24-hour radios, you need to make sure the load output can be switched on all the time and will not turn off by any automatic feature before purchasing the controller. Some controllers like the Steca brand pictured above-right, allow you to press a button to switch the load on or off, or use the menu to enable automatic functions such as turning it on x hours after darkness and off in the morning. The important thing is that it does allow the manual-only switching mode.

Step 5 – Mounting the panels


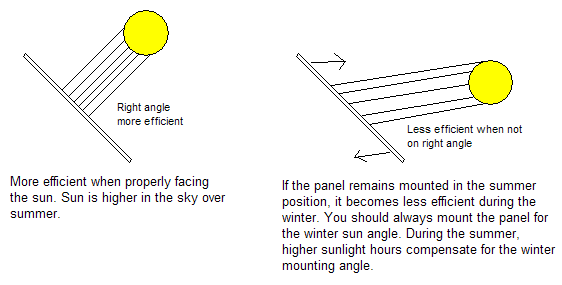
You will want to mount your panel so its surface is perpendicular to the sun’s rays during winter.

Mounting Panels

During winter, the sun will be on a lower angle than in summer. Because there is more sunlight hours in summer, we are not too concerned if the panel is less efficient because of its angle but in winter, it makes more of a difference. You should therefore mount your solar panel so it is most efficient in the winter.

Here is a link to a website that further explains how to mount your solar panel and calculate the angles. It gives examples for a hot water solar collector but the angles will be the same for a solar power panel. Solar Direct’s Angle Guide.

Step 6 – Hooking it all up

Hooking it All up

Step 7 – The worst has happend – the bank is flat


So what do you do when you find its been raining for too long and your battery bank has gone flat.

Ideally you should have:

  • A portable generator of around 300 watt with 12v DC and mains AC outputs – make sure the amp output of the 12v is less than your solar controllers limitation.
  • A few backup batteries or pairs of batteries to swap into to your bank to run your tower for 2 days.

The first step would be to check the solar controller. Some with lcd screens will show an error code to help you diagnose the problem. If its just been raining too long then you will need to add another solar panel and expand the size of your battery bank to prevent it from happening again.

You can disconnect your solar panels, and connect the solar panel input of your solar controller to the 12v output of the generator and safely charge the battery bank and run your tower again. For faster charging, you would disconnect the batteries from the solar controller and directly connect them to the 12v output of the generator.Another way is to take out some fully charged batteries from your workshop and connect them in parallel to your battery bank – this will flow on to power your devices and slightly charge some of your batteries.

No matter what you do to get it going, the fact is that you have to work out what caused the issues, fix it as soon as possible and power up your tower or risk loosing customers. It is not a good for your customer’s internet access to disconnect after x amount of days of rain because your battery bank is not big enough to suit your local area.

Tips Every Admin Should Know

The longer a person serves as a network admin, the more tips and tricks they are likely to pick up along the way. Some could be shortcuts, others might seem like magic, but all are intended to save you time and help you solve problems. Assume that all of these Windows commands should be run from an administrative command prompt if you are using Vista, Windows 7, or Windows 2008.

Active Directory

1. To quickly list all the groups in your domain, with members, run this command:

dsquery group -limit 0 | dsget group -members –expand

2. To find all users whose accounts are set to have a non-expiring password, run this command:

dsquery * domainroot -filter “(&(objectcategory=person)(objectclass=user)(lockoutTime=*))” -limit 0

3. To list all the FSMO role holders in your forest, run this command:

netdom query fsmo

4. To refresh group policy settings, run this command:

gpupdate

5. To check Active Directory replication on a domain controller, run this command:

repadmin /replsummary

6. To force replication from a domain controller without having to go through to Active

Directory Sites and Services, run this command:

repadmin /syncall

7. To see what server authenticated you (or if you logged on with cached credentials) you can run either of these commands:

set l

echo %logonserver%

8. To see what account you are logged on as, run this command:

whoami

9. To see what security groups you belong to, run this command:

whoami /groups

10. To see the domain account policy (password requirements, lockout thresholds, etc) run this command:

net accounts

Windows Networking

11. To quickly reset your NIC back to DHCP with no manual settings, run this command:

netsh int ip reset all

12. To quickly generate a text summary of your system, run this command:

systeminfo | more

13. To see all network connections your client has open, run this command:

net use

14. To see your routing table, run either of these commands:

route print

netstat -r

15. Need to run a trace, but don’t have Netmon or Wireshark, and aren’t allowed to install either one? Run this command:

netsh trace start capture=yes tracefile=c:\capture.etl

netsh trace stop

16. To quickly open a port on the firewall, run this command, changing the name, protocol, and port to suit. This example opens syslog:

netsh firewall set portopening udp 161 syslog enable all

17. To add an entry to your routing table that will be permanent, run the route add command with the –p option. Omitting that, the entry will be lost at next reboot:

route add 0.0.0.0 mask 0.0.0.0 172.16.250.5 –p

18. Here’s a simple way to see all open network connections, refreshing every second:

netstat –ano 1

19. You can add a | findstr value to watch for only a specific connection, like a client ip.addr or port:

netstat –ano | findstr 216.134.217.20

20. You can use the shutdown to shutdown or reboot a machine, including your own, in a simple scheduled task like this:

shutdown –r –t 0 –m \\localhost

21. To make planned DNS changes go faster, reduce the TTL on the DNS records you plan on changing to 30 seconds the day before changes are to be made. You can set the TTL back to normal after you confirm the changes have been successful.

22. Set a short lease on DHCP scopes that service laptops, and set Microsoft Option 002 to release a DHCP leas on shutdown. This helps to ensure your scope is not exhausted and that machines can easily get on another network when the move to a new site.

Windows 7

23. Want to enable the local administrator account on Windows 7? Run this command from an administrative command prompt. It will prompt you to set a password:

net user administrator * /active:yes

24. You can do the same thing during install by pressing SHIFT-F10 at the screen where you set your initial user password.

Windows 7 supports several useful new keyboard shortcuts:

25. Windows Key+G

Display gadgets in front of other windows.

26. Windows Key++ (plus key)

Zoom in, where appropriate.

27. Windows Key+- (minus key)

Zoom out, where appropriate.

28. Windows Key+Up Arrow

Maximize the current window.

29. Windows Key+Down Arrow

Minimize the current window.

30. Windows Key+Left Arrow

Snap to the left hand side of the screen

31. Windows Key+Right Arrow

Snap to the right hand side of the screen.

32. To quickly launch an application as an administrator (without the right-click, run as administrator), type the name in the Search programs and files field, and then press Ctrl-Shift-Enter.

Here are some tips that can save you from buying commercial software:

33. Need to make a quick screencast to show someone how to do something? The Problem Steps Recorder can create an MHTML file that shows what you have done by creating a screen capture each time you take an action. Click the Start button and type ‘psr’ to open the Problem Steps Recorder.

34. Need to burn a disc? The isoburn.exe can burn ISO and IMG files. You can right click a file and select burn, or launch it from the command line.

35. Windows 7 includes a screen scraping tool called the Snipping Tool. I have tons of users request a license for SnagIt, only to find this free tool (it’s under Accessories) does what they need.

36. You can download this bootable security scanner from Microsoft that will run off a USB key, which is very useful if you suspect a machine has a virus.

37. A great way to save all your command line tools and make them available across all your computers is to install Dropbox, create a folder to save all your scripts and tools, and add that folder to your path. That way, they can be called from the command line or any other scripts, and if you update a script, it will carry across to any other machine you have.

Windows 2008

38. You can free up disk space on your servers by disabling hibernate. Windows 2008 will create a hiberfil.sys equal to the amount of RAM. This is very useful with VMs that have lots of RAM but smaller C: drives. To disable hibernation, and reclaim that space, run this command:

powercfg -h off

39. You can get to the complete collection of Sysinternals tools online. You can even invoke them from the run command. Use the url: http://live.sysinternals.com or the UNC path: \\live.sysinternals.com\tools.

40. Speaking of the Sysinternals tools, almost any command line in this article can be run remotely on another machine (as long as you have administrative rights) using the psexec command included in the Sysinternals tools.

41. You can kill RDP sessions at the command line when you find that all the RDP sessions to a server are tied up.

regsvr32 query.dll [enter] You only have to do this the first time.

query session /server:servername [enter]

reset session # /server:servername [enter]

42. You can create a list of files and display the last time they were accessed, which is very useful when a network drive is low on space and users swear they have to have that copy of Office 2003 on the network. My advice? If they haven’t touched it in two years, burn it to DVD or write it to tape and then delete it from disk:

dir /t:a /s /od >> list.txt [enter]

43. The Microsoft Exchange Err command is one of the best all around troubleshooting tools you will find, as it can decode any hex error code you find as long as the products are installed on the machine. Download it from here.

44. You can see all the open files on a system by running this command:

openfiles /query

45. You can pull all the readable data out of a corrupt file using this command:

recover filename.ext

46. Need to pause a batch file for a period of time but don’t have the sleep command from the old resource kit handy? Here’s how to build a ten second delay into a script:

ping -n 10 127.0.0.1 > NUL 2>&1

47. If your Windows website has stopped responding, or is throwing a 500 error, and you are not sure what to do, you can reset IIS without having to reboot the whole server. Run this command:

iisreset

48. You can use && to string multiple commands together; they will run sequentially.

49. If you find yourself restarting services frequently, you can use that && trick to create a batch file called restart.cmd and use it to restart services:

net stop %1 && net start %1

50. You can download a Windows port of the wget tool from here, and use it to mirror websites using this command:

wget -mk http://www.example.com/

Linux

51. You can list files sorted by size using this command:

ls –lSr

52. You can view the amount of free disk space in usable format using this command:

df –h

53. To see how much space /some/dir is consuming:

du -sh /some/dir

54. List all running processes containing the string stuff:

ps aux | grep stuff

55. If you have ever run a command but forgot to sudo, you can use this to rerun the command:

sudo !!

56. If you put a space before a command or response, it will be omitted from the shell history.

57. If you really liked a long command that you just ran, and want to save it as a script, use this trick:

echo “!!” > script.sh

How to Enable downloading Recording files in goautodial/vicidial/vicidialnow

Vicidial and GoautoDial Recording File extraction:

It is recommended to free your disk space you remove the recordings from your vicidialnow/goautodial.

Usually the file is located at http://yourserveripadress/recordings

After fresh installation and you have tried to check your recordings, you will receive an error were as you were not allowed to access its directory. To enable your admin / manager you have to allow your internal LAN or specific IP range. Here is how you do that:-

And to allow your recordings

[root@vici ~]# vi  /etc/httpd/conf.d/vicidial_recordings.conf


Over here on the circled are you will see that usually it is denied from everyone. You just put  the # sign, to make it quoted . After that you will see it has allowed the usual Local LAN IP scheme 192.168 , if you have any different IP scheme such as 10.250 ; you can change it whatever you like.


Xen Shell Commands

Some more or less commonly used shell commands for managing Xen Virtual Machines (VM, also called Domains).

Basic commands
Show the running Virtual Machines: xm list
Start a virtual machine (myhost): xm create myhost
Gracefully shutdown (soft-reset) a virtual machine: xm shutdown myhost
Forced power Off (hard-reset) of a virtual machine: xm destroy myhost
Reboot a VM : xm reboot myhost

Using the console
Start a virtual machine and attach immediately a console: xm create -c myhost
Attach to the console of a VM (sample ID=4 for myhost, as shown in xm list):
xm console myhost or xm console 4
To leave / detach from the xen console press CTRL+5

Resources management and usage
To alter the RAM assigned to a VM (sample 256 Mb): xm mem-set myhost 256
To alter the CPUs assigned to a VM (sample 2 CPUs or cores): xm vcpu-set myhost 2

Shows resource utilization of the running hosts: xm top or xentop
Shows Virtual Machines uptimes: xm uptime

Saving and Restoring
Virtual Machines state can be saved on a file and later restored (sample destination file /var/tmp/myhost.save)
xm save myhost /var/tmp/myhost.save
Note that after this command the VM is no longer active: you can reboot from start it with xm create myhost or restore the saved machine state with xm restore /var/tmp/myhost.save
Note also that the save file ( /var/tmp/myhost.save ) is only the dump on the VM memory, for backups it’s of no use if you copy it to another physical host without copying also the VM config file and the file/LVM/partition used for the disk) .

Block Devices management
It’s is possible to add block devices (disks) to a running VM:
To add a local file ( /var/tmp/data.disk ) as /dev/xvdc to the myhost paravirtualized VM, in write mode:
xm block-attach myhost file://var/tmp/data.disk /dev/xvdc w
Mode can be: w (read/write), r (read only), w! (shared read/write, when the samer device is attached to two different VMs).
The above file can be created (here 4 Gb) with:
dd if=/dev/zero of=/var/tmp/data.disk bs=1024k count=4096

To add a local physical disk, partition or LVM (for example an USB stick):
xm block-attach myhost phy://dev/sda /dev/xvdc w
Note that I/O performances are much better when using physical devices or LVM instead of plain files as block devices for the VMs.

To list the currently attached block devices to a VM:
xm block-list myhost –long or xm block-list myhost
To detach a block device (51744 is the Vdev in xm block-list)
xm block-detach myhost 51744

Bridging management
On Linux the bridge utils can be used to show and manage bridging:
brctl show
brctl showmacs xenbr0
To manually create a new xen bridge interface and associate it a physical device.
brctl addbr xenbr2
brctl addif peth3

Dial Plan

A lesson in “dial pattern”

you have a “dial code” of 1 for “US” followed by the 10 digit number (which may or may NOT be a phone number. phone numbers in the US are NXXNXXXXXX. the “N” represents a digit that is NOT 0 or 1, since the area code and prefix of a US phone number cannot start with 0 or 1. No country code given, which implies you are dialing TO the US and FROM the US, so you don’t need a country code.

Moving right along.

You have a “country code” of “44” for uk followed by a 10 digit number.

now:
USA I need to dial 12127773456 and UK 4412127773456
here you would appear to have a 1NXXNXXXXXX properly formatted phone number with a 1 prefix (standard format for most voip carriers, or for pstn dialing for that matter if the call is not local).

but for the UK number you have 441NXXNXXXXXX which would appear to be a country code, then a dial code, then a 10 digit phone number.

the dial code should not be there for the uk number (certainly not AFTER the country code) unless your provider requires it (doubtful), if you give us the requirement as given by your provider we can help you out there. (there is a normal uk sample in extensions.conf).

next we have “dial prefix”. this is NOT related to the “dial code” “country code” or “phone number”. The dial prefix in vicidial is used to identify the TRUNK/CARRIER, and is then discarded (as it has completed its task).

in vicidial, in the definition of the campaign, you will generally define the “dial prefix” as 9 (or some other number, we’re doing 9 right now, work with me): so for a US number vicidial will dial the 9 (from the campaign) then the 1 (from the dial code field of the number from your “list” during import) then the 10 digit phone number. this will result in 912127771515.

Then your dial plan will have “EXTEN:1” in it, which will DISCARD (:1) the first digit (9) and result in 12127771515 being sent through to your provider. this is a match with _1NXXNXXXXXX so if that is what your provider expects, it’s a hit. if not … you need to modify your dial plan to match it.

if, however, you use a “non-prefix” dial plan (no :1, nothing is discarded) that uses “X.” to allow matching any length of phone number, you will not be able to differentiate between carriers. that’s fine, of course, if you only have one carrier and have no need to validate the length of your phone numbers.

there are samples that require less “thought” and directions in the manual for standard length phone number. i’ve found that creating an exten pattern for each country (by including the country code in the dial plan such as the sample uk supplied in extensions.conf) is very helpful as it allows specifying the carrier for each country individually and will NOT allow dialing a country not specified (so your manager doesn’t load 200,000 numbers for chile and spend a fortune in 3 hours when you’re not looking at the prices first!).

Here are the sample Dial Patter for 4 Countries

KOREA

exten => _982.,1,AGI(agi://127.0.0.1:4577/call_log)
exten => _982.,2,Dial(${SIPTRUNK}/${EXTEN:1},55,tToR)
exten => _982.,3,Hangup

US

exten => _91NXXNXXXXXX,1,AGI(agi://127.0.0.1:4577/call_log)
exten => _91NXXNXXXXXX,2,Dial(${SIPTRUNK}/${EXTEN:1},55,tToR)
exten => _91NXXNXXXXXX,3,Hangup

UK

exten => _944.,1,AGI(agi://127.0.0.1:4577/call_log)
exten => _944.,2,Dial(${SIPTRUNK}/${EXTEN:1},55,tToR)
exten => _944.,3,Hangup

AUSTRALIA

exten => _961.,1,AGI(agi://127.0.0.1:4577/call_log)
exten => _961.,2,Dial(${SIPTRUNK}/${EXTEN:1},55,tToR)
exten => _961.,3,Hangup


Cheers!

How to Strengthen your Company Efficiency

Before, companies as well as marketing firms intensely chose conventional types of marketing. This implies the application of over the air and publications media just like television advertisements, radio stations, billboard postings and magazine. Right now, the actual advertising and marketing system is in the direction of an internet innovation. Most global businesses are working with the online world to expand their own marketplace. Solutions such as SEO outsourcing will provide your online business the chance to increase in web presence plus return on investment. As a result of technical issues associated with Search Engine Optimization, it really is strongly suggested to use outsourcing for your SEO needs.

Continue reading